Sharing in SharePoint: Sites, Document Libraries, Folders, and Files
Sharing Sites
Almost every site in SharePoint is accessible in a read-only view to all PEPFAR SharePoint account holders. Occasionally, entire sites are created for limited audiences, this is rare because private folders and private document libraries usually suffice.
To Add and Remove Users from a Site
First decide if the user you’re adding should be a Visitor, Member, or a Poweruser.
- Visitors only have read-access to the site, given by the "READ" permission
- Members can edit documents in document libraries, change the approval status of documents, contribute new documents and folders, and delete existing documents and folders from document libraries, given by the "CONTRIBUTE" permission.
- Powerusers can do everything Members can do, but are also responsible for responding to requests from users for elevated site access. Powerusers control other’s permissions to the site at the Site, Document Library, Folder, and File level. They can also change the site layout by editing site pages, given by the "POWER RIGHTS" permission.
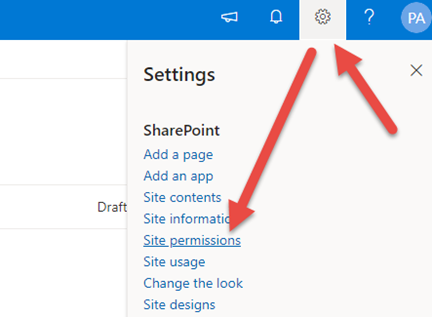
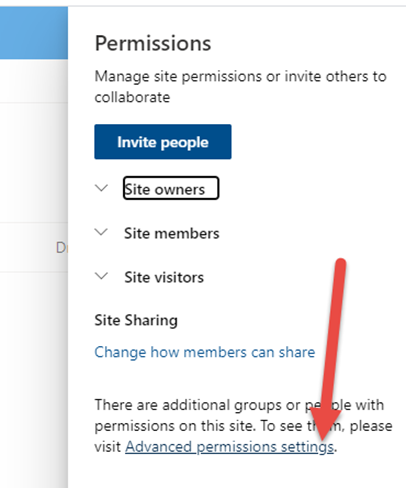
Now, go to the SharePoint Online site in question, wait for the Gear Icon to load in the upper right hand corner, it usually takes few seconds after the page loads. Click on the Gear, then Site permissions.
A fly-in Permissions window displays. Click Advanced permission settings.

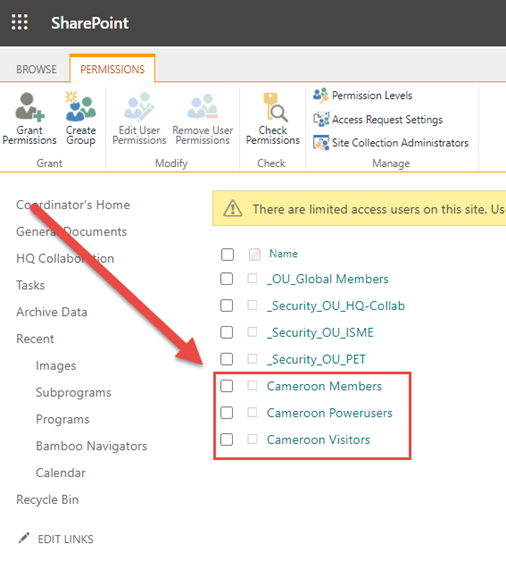
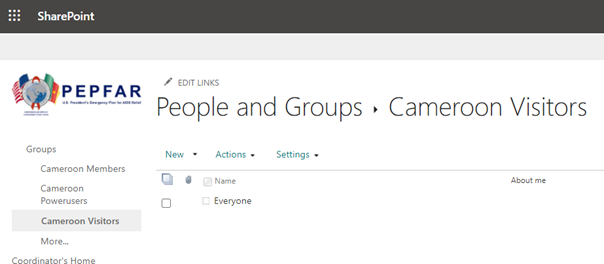
The Permissions Page appears. Click on the Permissions Group of the group you want to add your user to, either “SITE_NAME Visitors”, “SITE_NAME Members”, or “SITE_NAME Powerusers”. Do not edit the membership of other groups.
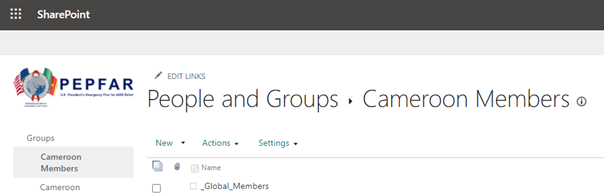
To Add a user to the selected group, click on the Name of the group. In this example, we’re using Cameroon Members:
To Add a user to this group, click New, then Add Users.

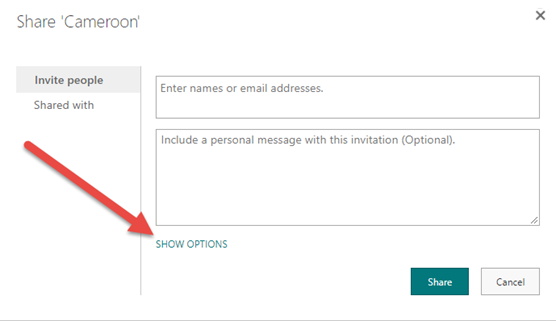
Click “SHOW OPTIONS” in the resulting dialog:
Decide if you want the system to generate an invitation email. Typically, this is left unchecked and the user is emailed or slacked personally. Enter the Names or Email Addresses above for the user(s) you wish to invite. If their name does not autocomplete when you type in their first name, their last name, or their email address, it’s because that user does not have an account. If you believe they do, try entering another email address for the user, and if that fails, submit a ticket here: https://pepfar.zendesk.com/hc/en-us/requests/new?ticket_form_id=167686 or send the user the link to request an account: https://pepfar.zendesk.com/hc/en-us/requests/new?ticket_form_id=204483. When complete, click Share.
Confirm that you see the users’ names in the list.

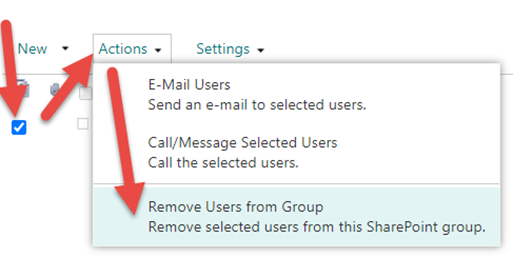
To remove a user select the checkbox to the far left of their name (not the little box right next to it) then Select Actions, Remove User.
Confirm that you no longer see the users’ names in the list.
To make a Site Private
Go to the SharePoint Online site in question, wait for the Gear Icon to load in the upper right hand corner, it usually takes few seconds after the page loads. Click on the Gear, then Site permissions.

A fly-in Permissions window displays. Click Advanced permission settings.
Click “SITE_NAME Visitors”
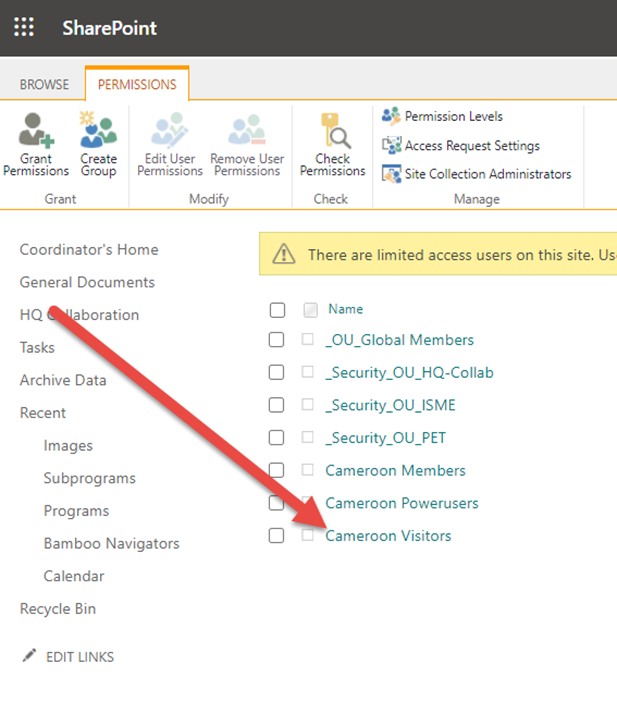
You can see “Everyone” is a member of “SITE_NAME Visitors”. This means all PEPFAR SharePoint Account Holders have read-only access to view this site.
To remove “Everyone” Select the checkbox to the far left of “Everyone” (not the little box right next to “Everyone”) then Select Actions, Remove User.

Now Only “SITE_NAME Members” and “SITE_NAME Powerusers” have access to the site. To Add and Remove users to these groups see the article on Adding and Removing Users from Sites.
Sharing Document Libraries
To Add and Remove Users from a Document Library
First decide if the user you’re adding should be a Visitor, Member, or a Poweruser.
- Visitors only have read-access to the site, given by the "READ" permission
- Members can edit documents in document libraries, change the approval status of documents, contribute new documents and folders, and delete existing documents and folders from document libraries, given by the "CONTRIBUTE" permission.
- Powerusers can do everything Members can do, but are also responsible for responding to requests from users for elevated site access. Powerusers control other’s permissions to the site at the Site, Document Library, Folder, and File level. They can also change the site layout by editing site pages, given by the "POWER RIGHTS" permission.
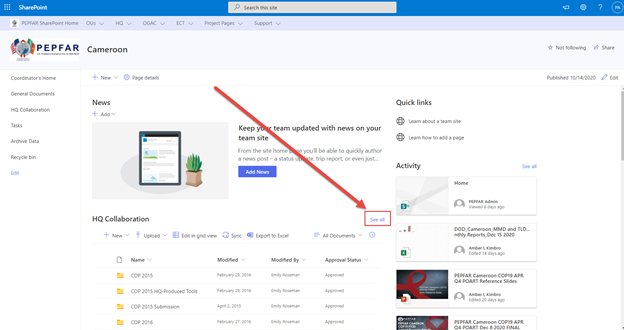
Now, go to the Document Library in question. If it’s embedded in another page, you’ll see “See all” in the upper right hand corner, click this to go to the actual document library. Below you can see the HQ Collaboration document library is embedded.
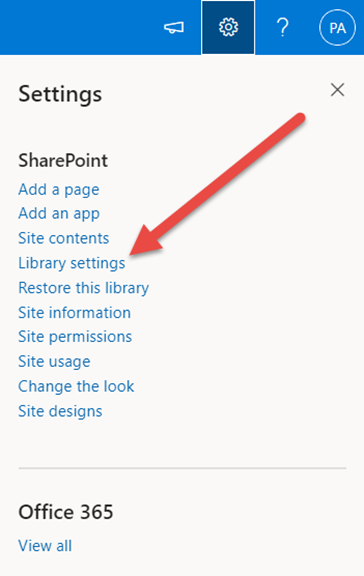
Wait for the Gear Icon to load in the upper right hand corner, it usually takes ~5 seconds after the page loads. Click on the Gear, then Library Settings
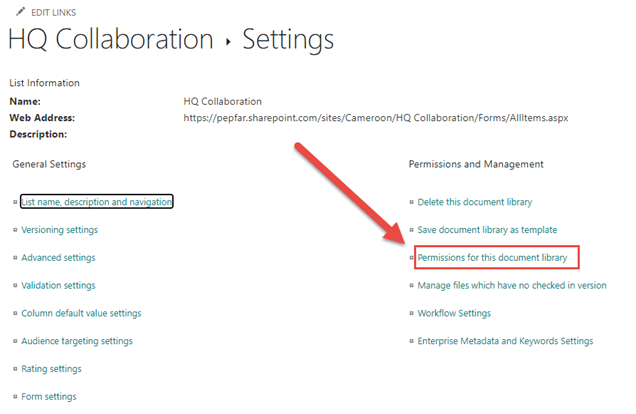
The settings page appears. Click “Permissions for this Document Library”.
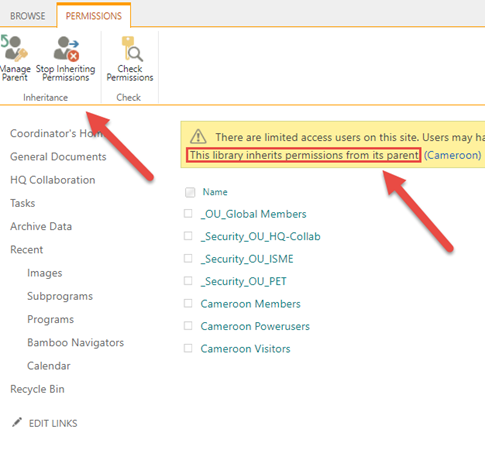
Has this document library already been customized?
Check to see if this document library already has custom permissions.
If you see “Stop Inheriting Permissions” on the menu and “This library inherits permissions from its parent” as below, then you know your library has NOT been customized, and the Document Library has the same permissions that the SITE does: Site Visitors have read access to the documents, Site Members can edit, delete, contribute documents and change their draft/pending/approval statuses, and Powerusers have full control and can alter other’s permissions. Best practice at this juncture is to NOT customize a non-customized document library, but instead to change this user’s permission at the site level. If a customized document library is needed, create a ticket to request a new document library.
If the document library already has custom permissions, you’ll see “Delete unique permissions” on the menu.
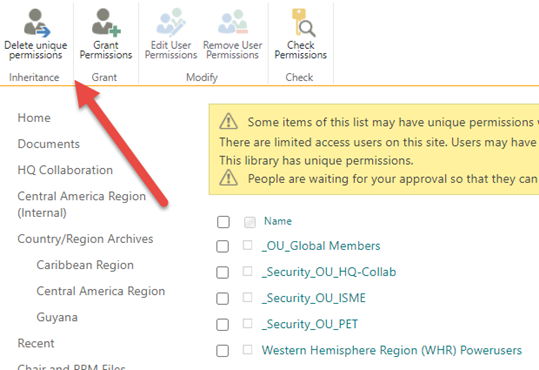
If your document library has custom permissions, it can be suffixed with a “(Private)” or “(Internal)” in the name to let other users know they shouldn’t expect to have access to it, as in this folder name:

In this case, you can add and remove users to/from the appropriate group depending on the level of access needed, or grant individual users specific permissions using “Grant Permissions”. First we’ll cover Granting Permissions, then we’ll discuss removing users from document libraries.
Add and Remove user to/from groups
Click on the Permissions Group of the group you want to add your user to, either “SITE_NAME Visitors”, “SITE_NAME Members”, or “SITE_NAME Powerusers”. Do not edit the membership of other groups.

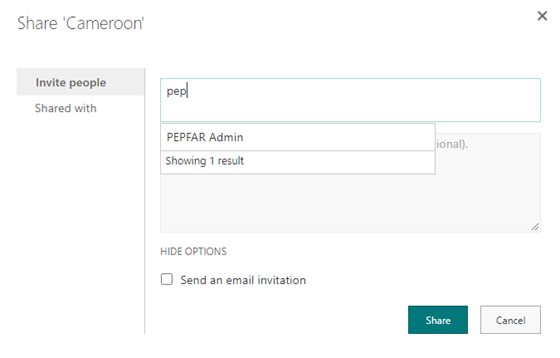
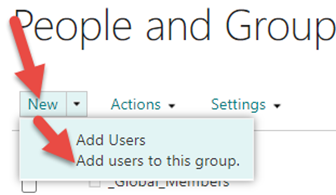
To Add a user to the selected group, click on the Name of the group. In this example, we’re using Cameroon Members:

To Add a user to this group, click New, then Add Users.
Click “SHOW OPTIONS” in the resulting dialog:

Decide if you want the system to generate an invitation email. Typically, you will leave this unchecked and email the user personally to let them know if needed. Enter the Names or Email Addresses above for the user(s) you wish to invite. If their name does not autocomplete, it’s because that user does not have an account. If you believe they do, try entering another email address for the user, and if that fails, submit a ticket. When complete, click Share.

Confirm that you see the users’ names in the list.
To remove a user select the checkbox to the far left of their name (not the little box right next to it) then Select Actions, Remove User.
Confirm that you no longer see the users’ names in the list.
Grant Permissions
If, and only if, there is no existing appropriately permissioned user group for this user (in which case you would just add them to that user group), then click “Grant Permissions” to permission them individually.

Click “SHOW OPTIONS” then select the appropriate options in the resulting dialog, and click Share. Selecting “Share everything in the folder, even items with Unique Permissions” will add them to all folders, even ones that already have custom permission. In the following screenshot, we're adding a member, so we give them "Contribute" permission.
Removing users from a Document Library Completely
Removing a user from a document library can take multiple steps because they may have been given access to the library through multiple groups.
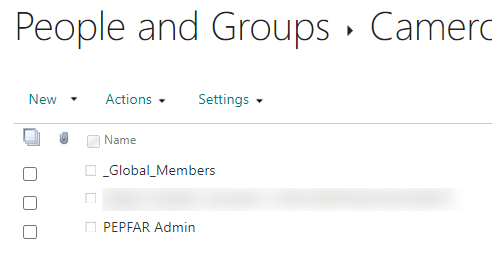
First, check permissions for the user in question. Click “Check Permissions” then enter the name of the user, then “Check now”
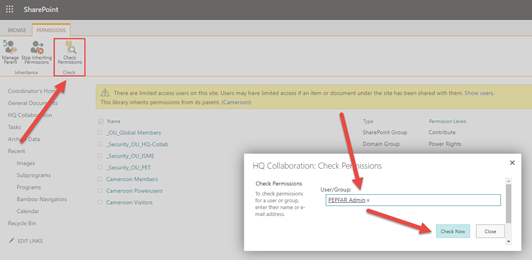
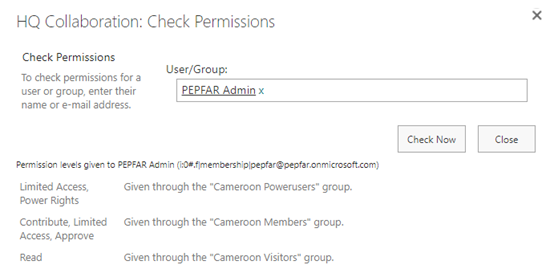
The results are displayed below: Here you can see PEPFAR Admin is a member of the Powerusers, Members, and Visitors groups, so that user would need to be removed from all three of those groups to deny them access to this document library.
Remove the user from all necessary groups as described in “Add and Remove User to/from Groups”
Sharing Files and Folders (for Powerusers)
To share files and folders in SharePoint online, first determine your audience. You may want to keep the default permissions granted to users of the site, or you may want to limit access to a folder or file specifying that certain users can edit a document, while others can only view it. Secondly, determine how you want to share the file or folder – you can direct users to the document library containing it, or you can create and send out a special link. These “Special Links” can come with access rights of their own that ignore the underlying access rights on the file or folder in the document library that contains it.
To share an existing folder using its underlying permissions
To share an existing folder without changing its permissions for the users accessing it, you can click the three dots next to the file or folder, and use the “Copy Link” menu option, selecting “People with existing access can use the link”.
To create a file or folder with custom permissions:
If you’re creating a file or folder that you want site members and power users to be able to edit, and for site visitors to only be able to view, you can create this folder or add this file to the site’s Shared Documents document library. By convention, the Shared Documents library does not contain customized private or internal files or folders.
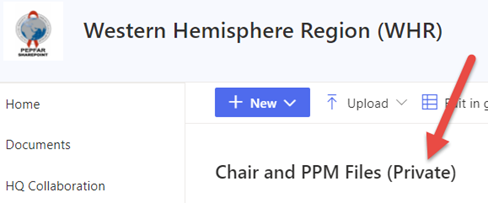
If you don’t want visitors to be able to read this file or folder, or for the site’s powerusers and members to be able to edit it, place it in customized Document Library. These document libraries will be named with a (Private) or (Internal) suffix like the below:
If there is no such customized document library on your site, submit a ticket and one will be created for you.
Inside your customized document library, Inheritance will already be broken. You can verify this by following the steps in “Has this document library already been customized?” above. [In short: If you see “Stop Inheriting Permissions” on the permissions menu your library has NOT been customized, if the document library already has custom permissions, you’ll see “Delete unique permissions” on the menu.]
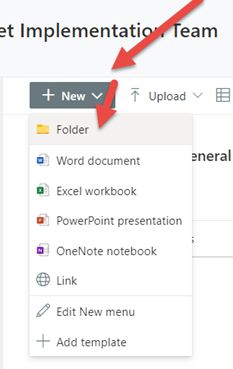
Navigate to the parent folder where you want to create your private folder. Click “New”, “Folder”.
Manage Access
Now enter your folder name and append (Private), or upload your file. Now click the three dots next to your file/folder name, and click “Manage Access”
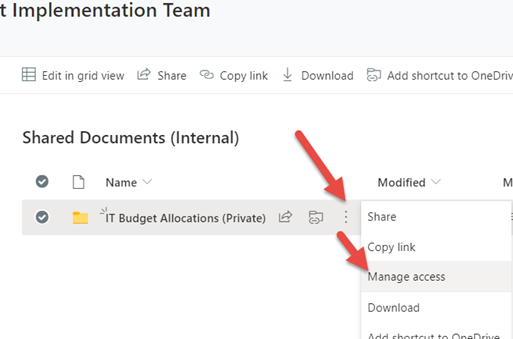
Then click Advanced
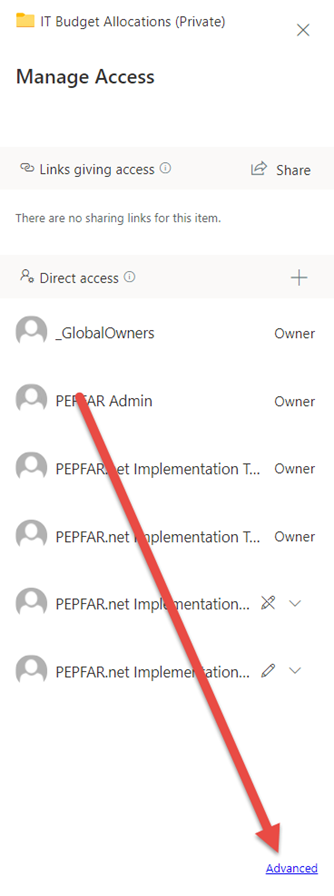
From here, you can control user’s access to this file/folder in an identical way to Document Libraries, see above to
- Add and Remove user to/from groups
- Grant Permissions
- Remove Users Completely
Special Links to Files created via “Share” or "Copy Link"
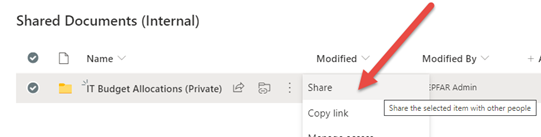
You can create special links to files and folders using “Share”. Click on the three dots, then “Share”.
The Send Link dialog appears. Click in the top square to see your options.
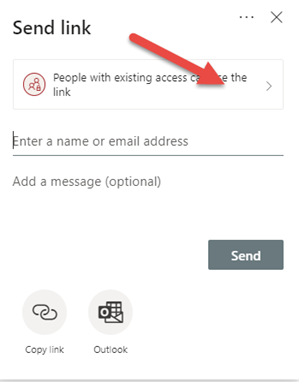
You can select any of the following three options:
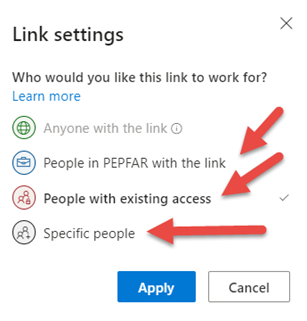
- People in PEPFAR with the link - This link can used by anyone with a PEPFAR SharePoint account, and can be tied to unique permissions.
- People with existing access provides a link that can be used by people who already have access to the file, folder, or list item. It does not change the permissions on the item. Use this if you’re just drawing people’s attention to a specific item.
- Specific people creates a link that only the people that you specify can use to access the file or folder. If you select this option, enter the names or email addresses of the people to whom you want to give access to. Can be tied to unique permissions.
Only “People in PEPFAR with the link” and “Specific people” allow you to tie unique permissions to the link, see the additional options below, when one of these sharing options is selected:
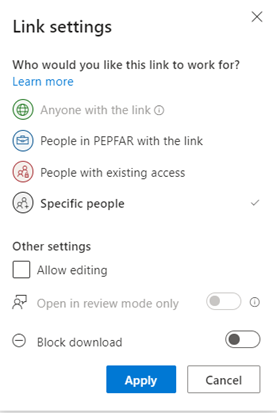
Files opened by shared links are read-only by default, unless you select “People with Existing Access” (in which case the permissions on the file set in the document library apply to the link as well). If you select “People in PEPFAR with the link” or “Specific people” then you can further say anyone granted access to the file via this link can also Edit (or Edit in Review Mode Only), or you can configure the link to prevent the file from being downloaded.
Reviewing Special Links:
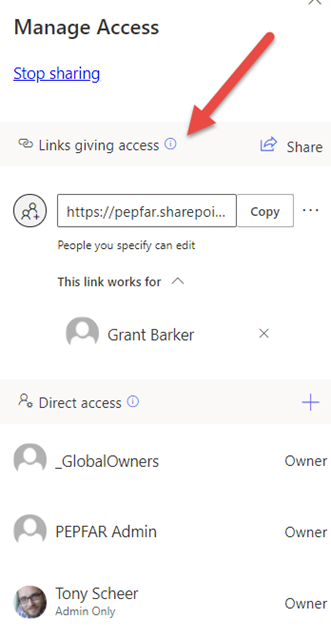
To view access granted by special links and delete special links, click the three dots next to the file or folder and select Manage Access. On the right hand side, you’ll see “Links giving access” – the links, the access they give and to whom.
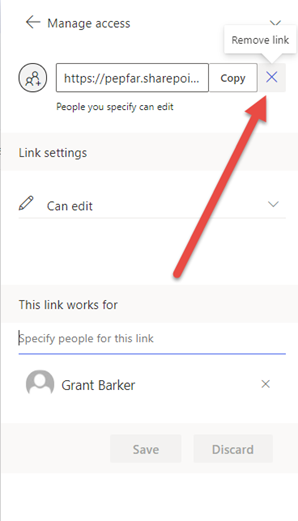
To Delete a Special Link
From the Manage Access view of the special link, click the three dots to the right of the link, then click the “X” to remove the link.
PLEASE NOTE the following GOTCHA!
Permissions set on links only apply to the files as they are accessed from the link.
Example:
Suppose person A is a poweruser over Botswana. Person B creates a file in “Shared Documents (Internal)” in the Botswana site, knowing regular visitors to the site can’t view these internal documents. B wants to make sure no one can edit the file, so B creates a link that doesn’t allow editing and sends it out to the Botswana team. Person A accesses the document and wants to make a change, but can’t because the link was set to make all users accessing the document using the link read-only. But A knows the document is stored in Botswana’s “Shared Documents (Internal)” library and digs for minute and finds it. Because A is a power user A can open the file for editing directly from the document library. Person B is surprised because they didn’t anticipate someone going in to edit the file directly from the document library. B should have made the file in the document library private only to B and the Global Powerusers, then B’s links would be the *only* way anyone else could get at the files.
0 Comments